The decentralized ecosystem has expanded far beyond the early days of a single blockchain. Today, the crypto landscape is a vibrant archipelago of interconnected networks, each offering unique strengths, applications, and communities. For users who want to explore these diverse environments, understanding how to configure a wallet to communicate with different blockchains is a fundamental skill.
Most modern Web3 wallets are designed to interact with the Ethereum mainnet by default. However, the decentralized finance (DeFi) sector has evolved to include numerous other compatible chains. To access these, users must manually or automatically add custom network details to their wallet interface.
This process allows your wallet software to talk to a different set of nodes. These nodes validate transactions and maintain the ledger for that specific blockchain. Without this connection, your wallet cannot see assets or sign transactions on the new network.
Mastering this configuration opens the door to a wider world of digital finance. It enables access to networks with lower fees, faster transaction times, or exclusive decentralized applications (dApps) that do not exist elsewhere.
The Mechanics of Blockchain Connections
At the heart of wallet configuration is the Remote Procedure Call (RPC). This is a communication protocol that allows your wallet application to request information from a blockchain node. When you check your balance or send a transaction, your wallet sends a request via the RPC endpoint.
The node receives this request, processes it against the blockchain's current state, and returns the result. If the RPC endpoint is slow or unresponsive, your wallet will fail to load balances or execute trades. This is why having a reliable RPC URL is crucial for a smooth user experience.
Different networks operate on different parameters. While many popular chains share the same underlying architecture as Ethereum (known as EVM compatibility), they possess distinct identifiers. Your wallet needs these specific details to ensure it is broadcasting your transaction to the right place.
If you attempt to send a transaction intended for one network while connected to another, the request will fail or be rejected. In worse scenarios, if the addresses are compatible but the networks are different, users might lose access to funds until they configure the correct network settings to view them.
Why Enter a New Chain?
The motivation to add a custom network often stems from the desire to use specific applications. Developers frequently build on alternative chains to bypass the limitations of older, more congested networks. These newer environments often promise higher throughput and significantly lower costs.
For example, a user might want to trade on a decentralized exchange that is exclusive to a specific high-speed blockchain. To do so, they must first configure their wallet to recognize that chain. Once connected, they can interact with the exchange just as they would on the main Ethereum network.
Another common driver is the non-fungible token (NFT) market. Artists and creators may choose specific blockchains for their low minting fees or eco-friendly consensus mechanisms. Collectors who wish to acquire these pieces must migrate to the network where the art resides.
Yield farming and lending opportunities also vary wildly between ecosystems. Different networks may run liquidity mining campaigns to attract capital, offering rewards that are not available elsewhere. Chasing these opportunities requires the technical ability to move between chains fluently.

Understanding Wallet Compatibility
Not all wallets support custom networks. Before attempting to add an RPC, it is essential to ensure you are using a non-custodial wallet that supports multi-chain functionality. Hardware wallets and browser extensions are the most common tools for this purpose.
Custodial vs. Non-Custodial Options
Custodial wallets, often provided by centralized exchanges, typically do not allow users to add custom RPCs. In these environments, the service provider manages the technical connections on the backend. Users simply select a network for deposit or withdrawal, but they do not interact directly with the blockchain's protocol.
In contrast, self-custodial wallets give users full control over their private keys and network settings. These wallets act as a direct interface to the blockchain. Because the user is in charge, they must manually tell the software where to look for their data.
This distinction is vital. If you are holding funds on a centralized exchange, you do not need to add an RPC to view them. However, you cannot use those funds to interact with dApps until you withdraw them to a self-custodial wallet configured for the correct chain.
EVM Compatibility Explained
The ability to add custom networks is most commonly found in wallets that support the Ethereum Virtual Machine (EVM). Chains that are "EVM-compatible" speak the same language as Ethereum. This allows the same wallet address and private key to work across dozens of different blockchains.
When you add a network like Polygon, Avalanche, or Binance Smart Chain to an Ethereum-based wallet, you are essentially telling the wallet to use the same address but talk to a different ledger. This interoperability is a cornerstone of the modern DeFi experience.
It simplifies the user journey significantly. Instead of managing a dozen different seed phrases for a dozen different coins, a user can maintain one secure secret phrase. This single key grants access to assets across all configured EVM networks.
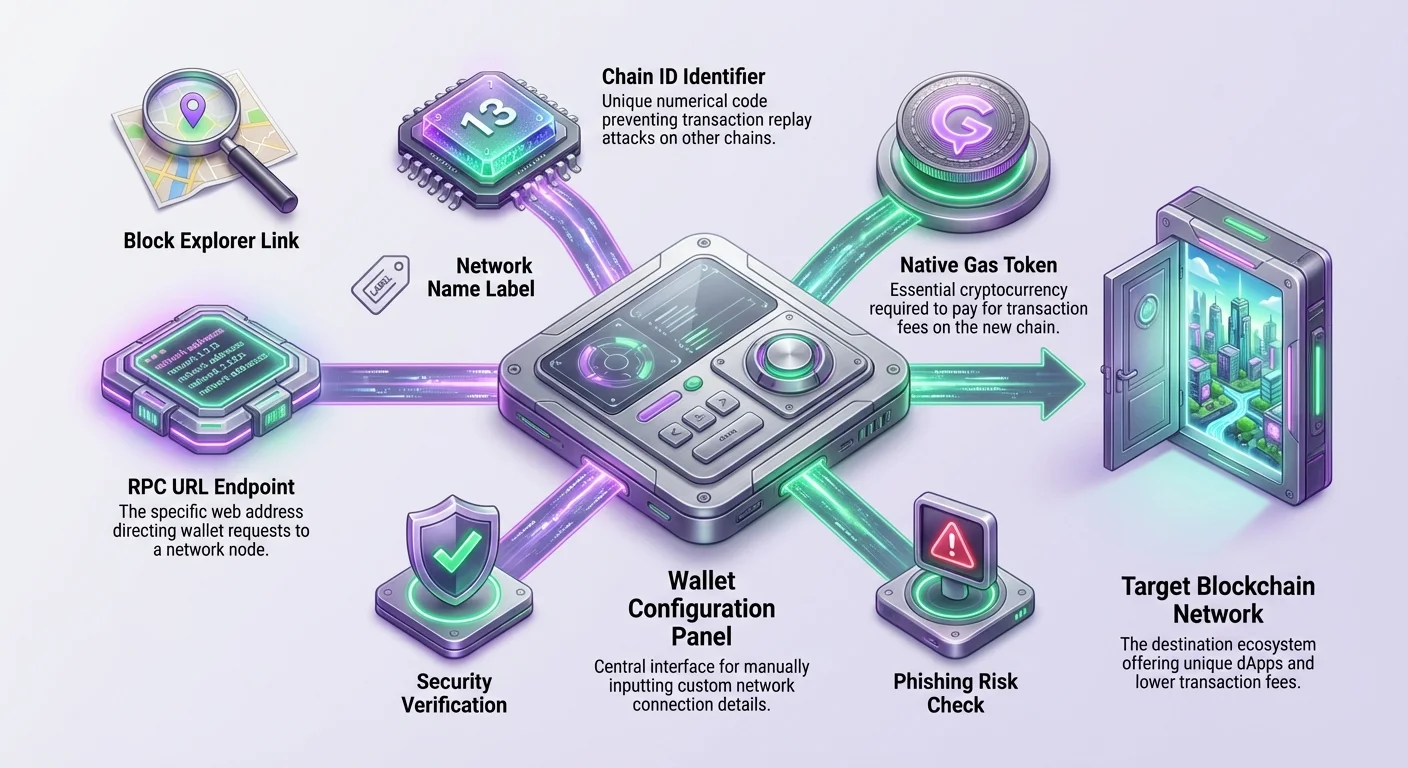
Essential Network Information
To add a network manually, you need specific pieces of data. This information acts as the coordinates for your wallet. Entering incorrect data can result in connection errors or, in rare cases, interaction with a malicious spoof chain.
The RPC URL
The RPC URL is the web address of the node your wallet will connect to. It typically looks like a standard website URL. There are often multiple public RPC endpoints available for major networks. If one is congested, you can switch to another to improve performance.
Some advanced users prefer to run their own nodes or pay for private RPC endpoints. This can offer faster transaction propagation and better privacy. For most users, however, the public endpoints provided by the network's foundation are sufficient.
| Field Name | Purpose | Example |
|---|---|---|
| Network Name | Identifies the chain in your menu | Polygon Mainnet |
| New RPC URL | The connection point to the blockchain | https://polygon-rpc.com |
| Chain ID | Unique number identifying the network | 137 |
Chain ID and Currency Symbol
The Chain ID is a unique number that identifies the network. It is a critical safety feature. It prevents "replay attacks," where a transaction signed for one network is maliciously broadcast on another. If the Chain ID in your settings does not match the node's ID, the wallet will reject the connection.
The Currency Symbol tells the wallet what to call the native asset used for gas fees. On Ethereum, this is ETH. On other chains, it might be MATIC, AVAX, or BNB. While this is largely cosmetic for the user interface, setting it correctly helps avoid confusion when reading balances.
Finally, the Block Explorer URL is an optional but highly recommended field. It allows the wallet to provide clickable links to your transaction history. This makes it much easier to verify that trades have been confirmed on-chain.
Safety Protocols and Verification
Security is paramount when configuring new networks. Because wallets are the gateway to your digital assets, they are prime targets for malicious actors. A common scam involves tricking users into adding a compromised network that reports fake balances or phishes for approvals.
Verifying Source Data
Always source your network details from official documentation. Do not trust random forum posts or unverified social media messages. The official website of the blockchain project is the safest place to find RPC details.
Aggregator sites that list network parameters can also be useful, provided they are reputable. Sites like CoinGecko or CoinMarketCap often list the necessary token and network details. Cross-referencing the Chain ID and RPC URL across multiple trusted sources is a good habit.
Be wary of search engine ads. Scammers often buy ad space for search terms related to popular network setups. These ads lead to fake documentation sites designed to compromise your wallet. Always double-check the URL in your browser bar.
Phishing Risks
Phishing attacks in this context can be subtle. A malicious website might prompt you to "Add Network" automatically. If you approve this request without checking the details, you might be connecting to a node controlled by the attacker.
While connecting to a malicious node does not instantly steal your funds (they still need your private key or a transaction signature), it can deceive you. A fake node could show you false deposit confirmations, leading you to believe a transaction succeeded when it didn't.
Furthermore, a malicious RPC could track your IP address and associate it with your wallet address. This compromises your privacy. Using a VPN and sticking to trusted public endpoints mitigates this risk.
The Step-by-Step Configuration Process
Adding a custom network is a straightforward process once you have the correct data. While the user interface may vary slightly between different wallet applications, the core steps remain consistent across the industry.
Locating the Settings
Open your wallet extension or mobile application. Look for the network selection dropdown menu, usually located at the top of the screen. This menu displays the network you are currently connected to, such as "Ethereum Mainnet."
Clicking this menu usually reveals a list of available networks and a button labeled "Add Network" or "Custom RPC." In some wallet interfaces, this option might be hidden within the general "Settings" menu under a "Networks" tab.
Once you find the input screen, you will see blank fields corresponding to the data points discussed earlier: Network Name, RPC URL, Chain ID, Currency Symbol, and Block Explorer URL.
Inputting the Data
Carefully copy and paste the details from your trusted source into the respective fields. Precision is key here. Extra spaces or typos in the RPC URL will prevent the connection from being established.
Some wallets perform a real-time check as you type. If the Chain ID does not match the RPC URL provided, the wallet may display a red warning message. This indicates that the node you are pointing to is not broadcasting the Chain ID you entered.
If you receive an error message saying the Chain ID is currently used by another network, check your existing list. You may have already added this network under a different name, or you may be trying to add a testnet that conflicts with a mainnet setting.
Saving and Switching
After filling in all the fields, click the "Save" or "Add" button. The wallet will attempt to ping the RPC URL to verify connectivity. If successful, the new network will be added to your list.
Most wallets will automatically switch your view to the new network immediately after adding it. You should see the currency symbol change to the native asset of that chain. Your balance will likely show zero if you have not yet bridged any funds.
You can now toggle between networks using the dropdown menu at any time. Remember that your assets live on the blockchain, not inside the wallet software. Switching networks simply changes which ledger you are looking at.
Automatic Configuration Methods
To streamline the user experience, many decentralized applications and tools offer an automatic configuration feature. This eliminates the need for manual copy-pasting and reduces the risk of human error.
Using dApp Connections
When you visit a dApp built on a specific chain for the first time, it will often detect that you are on the wrong network. The application will trigger a pop-up prompt in your wallet asking specifically to switch networks.
If you do not have the network added, the prompt will ask for permission to add it. This request will display the network details (Name, Chain ID, URL) for you to review. This is generally safer than manual entry, provided you trust the dApp you are visiting.
This mechanism relies on a standard provider API that allows websites to suggest network configurations. It is a powerful feature that makes moving between chains seamless for new users.
Network Aggregators
There are specialized websites dedicated solely to helping users add networks. These platforms maintain a comprehensive list of EVM-compatible chains. Users can search for a network and click a "Connect Wallet" button to add it instantly.
These aggregators verify the status of RPC endpoints in real-time. They often provide a score or color code indicating the health and latency of the connection. This ensures you are adding a working endpoint rather than a defunct one.
Using an aggregator is often the fastest way to set up a new wallet. However, always ensure you are on the legitimate aggregator site. Verify the domain name carefully before connecting your wallet to any third-party tool.
The Necessity of Native Assets
Adding the network is only the first step. To transact on any blockchain, you must pay gas fees. These fees are paid in the network's native currency, which is different for every chain.
The Gas Fee Concept
On the Ethereum network, you pay for transactions with Ether (ETH). On the Avalanche network, you pay with AVAX. On Polygon, you use MATIC. Even if you have thousands of dollars in stablecoins in your wallet, you cannot send them if you have zero balance of the native gas token.
This is a common stumbling block for beginners. They add the network, see their token balances, but find themselves unable to move anything. The transaction button remains greyed out or fails immediately because the wallet detects insufficient funds for gas.
Before you can effectively use a new chain, you must acquire a small amount of its native currency. This "seed" capital allows you to execute your first swaps and transfers.
Acquiring Gas Tokens
There are several ways to get native tokens onto a new wallet. The most direct method is to buy them on a centralized exchange and withdraw them to your wallet address via the correct network.
For example, if you need AVAX, you can purchase it on a major exchange and select "Avalanche C-Chain" as the withdrawal network. The funds will arrive in your wallet ready to be used for gas.
Alternatively, some cross-chain bridges offer a "faucet" or "gas on destination" feature. This service converts a small portion of the assets you are bridging into the native gas token of the destination chain. This prevents you from arriving on a new chain with no way to pay for transactions.
Bridging Assets Between Chains
Once your wallet is configured and you have a plan for gas, the next logical step is moving your capital. Since blockchains are distinct ledgers, you cannot simply send Bitcoin to an Ethereum address or Ethereum to a Solana address directly.
How Bridges Work
Bridges are protocols that lock assets on one chain and issue a corresponding representation on another. When you use a bridge, you are essentially depositing funds into a vault on the source chain. The bridge protocol verifies this deposit and mints tokens on the destination chain.
This process can take anywhere from a few minutes to several hours, depending on network congestion and the security confirmations required by the bridge. It is important to be patient and not panic if funds do not appear instantly.
Most bridges have a user-friendly interface where you connect your wallet, select the source and destination chains, and specify the asset to move. Always use official bridges recommended by the project foundation to minimize smart contract risk.
Cross-Chain Swaps
Some advanced decentralized exchanges offer cross-chain swaps. These platforms combine bridging and trading into a single transaction. You might send USDC from Ethereum and receive AVAX on Avalanche in one go.
This is highly convenient as it solves the gas problem mentioned earlier. By swapping into the native token of the destination chain during the bridge process, you arrive fully equipped to start interacting with dApps immediately.
However, these convenience features often come with slightly higher fees or exchange rate spreads. Users should weigh the cost of convenience against the complexity of manual bridging and trading.
Managing a Multi-Chain Portfolio
As you add more networks and bridge more assets, managing your portfolio becomes more complex. A single wallet address might hold balances across ten different blockchains. Keeping track of where your money is can be a challenge.
Token Visibility
Just as you must add custom networks, you often need to manually import custom tokens. Your wallet might not automatically display a niche token you bought on a decentralized exchange. You have to tell the wallet the contract address of that token to see your balance.
This does not mean the tokens are gone; they are safely on the blockchain. The wallet just needs the correct filter to display them. This is similar to adding a custom network: you need the contract address, symbol, and decimal precision.
Keeping a personal record or using a portfolio tracker application can help. These external tools scan your address across multiple EVM chains and aggregate your total net worth in one dashboard.
Segregating Active and Inactive Assets
For security and organization, it is wise to segregate your assets. Consider using different wallet addresses for different purposes. You might have one "vault" address that you never connect to dApps, used only for holding long-term assets.
Then, use a separate "hot" wallet for daily trading and interacting with new chains. If you accidentally sign a malicious contract on a new, experimental chain, only the funds in that specific hot wallet are at risk.
This separation of concerns is a professional habit. It limits the blast radius of any potential security failure and makes accounting easier.
Troubleshooting Connection Issues
Even with correct configuration, connection issues can occur. The distributed nature of blockchain nodes means that performance is not always guaranteed. Knowing how to troubleshoot these problems is essential for a stress-free experience.
RPC Congestion
If your transaction history is not loading or your balances are spinning indefinitely, the RPC endpoint might be down or congested. This happens frequently during periods of high market volatility when thousands of users flood the network.
The solution is to switch to a backup RPC URL. Go back into your network settings and replace the URL with an alternative public endpoint. Many networks list three or four different official URLs for this exact reason.
Rotating through available endpoints often resolves connectivity issues instantly. It is akin to refreshing a web page or switching to a different Wi-Fi network to get a better signal.
Resetting the Account
Sometimes, the local data in your wallet application can get out of sync with the blockchain. This can cause "stuck" transactions that appear pending forever. In this case, most wallets offer a "Reset Account" option in the advanced settings.
This sounds drastic, but it is harmless. It does not delete your wallet or your funds. It simply clears the local transaction history cache and forces the wallet to re-download the correct data from the RPC. This usually clears any stuck pending transactions.
Always ensure you have your seed phrase backed up before performing any troubleshooting, just in case you accidentally click the wrong button or need to reinstall the software entirely.
Exploring dApp Ecosystems
With your wallet configured and funded, you are ready to explore. Each chain has its own culture and set of dominant applications. The "blue chip" protocols on Ethereum often have forks or official deployments on other chains.
Single dApp Chains
Some blockchains are built specifically to host a single massive application. In these cases, the "bridge" is often integrated directly into the application's onboarding flow. The user experience is designed to be seamless, guiding you from the mainnet to the app-chain without requiring complex manual settings.
These chains offer curated experiences. Because the entire blockchain is optimized for one use case—be it gaming or trading derivatives—performance is usually exceptional. Entering these chains feels less like configuring a router and more like logging into a game.
Finding Opportunities
To find the best yields or the most popular NFT collections, use data aggregators. Look for "Top dApps on [Network Name]" lists. These resources rank applications by user volume and total value locked (TVL).
Starting with the most popular applications is generally safer. High liquidity and a large user base usually imply that the protocol has been battle-tested. Be cautious with brand new projects that have low liquidity, as they carry higher risks of bugs or "rug pulls."
Best Practices for Digital Hygiene
Maintaining a clean and secure digital environment is crucial when operating across multiple networks. The more touchpoints you have, the more disciplined you must be.
Revoking Permissions
When you interact with a dApp, you grant it permission to spend your tokens. These permissions persist even after you leave the site. If that dApp is later compromised, attackers could theoretically drain the tokens you approved.
Periodically use a "revoke" tool to scan your wallet for open approvals. Remove permissions for old dApps you no longer use. This closes the backdoor and secures your assets against future exploits of past interactions.
Bookmark Management
As mentioned in security protocols, phishing is a constant threat. Create a folder in your browser specifically for your crypto banking. Bookmark the trusted versions of your favorite exchanges, bridges, and RPC aggregators.
Never navigate to financial applications via Google search if you can avoid it. Using your verified bookmarks ensures you are always landing on the legitimate interface, bypassing the danger of typo-squatting domains.
Privacy Considerations
It is worth noting that RPC providers can see your IP address and the requests you make. While they cannot steal your private keys, they can build a profile of your activity. This data could theoretically be used to link your real-world identity to your wallet address.
Using Privacy-Centric RPCs
Some providers offer privacy-focused endpoints that do not log user data. Switching to these providers can enhance your anonymity. Additionally, using a VPN adds a layer of obfuscation between your physical location and the blockchain node.
For the ultimate privacy, running your own node is the gold standard. This ensures that you are broadcasting your own transactions to the network without relying on any third-party intermediary. While technical, it is the truest expression of self-sovereignty in crypto.
Traceability on Public Ledgers
Remember that adding a network does not change the public nature of the blockchain. Once you bridge funds, the link between your Ethereum address and your new network address is permanently recorded on-chain.
If your Ethereum address is KYC'd (linked to your identity) via a centralized exchange, your activity on the new chain is also traceable to you. Privacy in a multi-chain world requires conscious effort and advanced tools like mixers or privacy coins if true anonymity is the goal.
Conclusion
Adding a custom network to your wallet is a foundational skill for any crypto user. It transforms a simple storage tool into a passport for the entire decentralized web. By understanding the role of RPCs, Chain IDs, and gas tokens, you empower yourself to navigate the ecosystem with confidence.
This technical literacy protects you. It helps you spot phishing attempts, troubleshoot failed connections, and manage your assets across diverse ledgers. Whether you are chasing high yields on a new DeFi protocol or collecting art on an eco-friendly chain, the process begins with those simple configuration settings.
As the industry evolves, wallet interfaces will likely become smarter, automating much of this friction away. Until then, mastering the manual configuration of your digital keys remains a rite of passage. It is the step that takes you from a passive observer to an active participant in the global economy of the future.
Always double-check every URL and Chain ID before connecting your wallet, because in a decentralized world, you are the only one responsible for your security.