Entering the world of decentralized finance requires a distinct set of digital tools and a fundamental shift in how you manage assets. Unlike traditional banking apps or centralized exchanges where a third party secures your funds, decentralized environments place you in full control. This shift transfers the responsibility of security, transaction management, and connectivity directly to you. To participate effectively, you must understand the technical "stack" required to interact with blockchain networks.
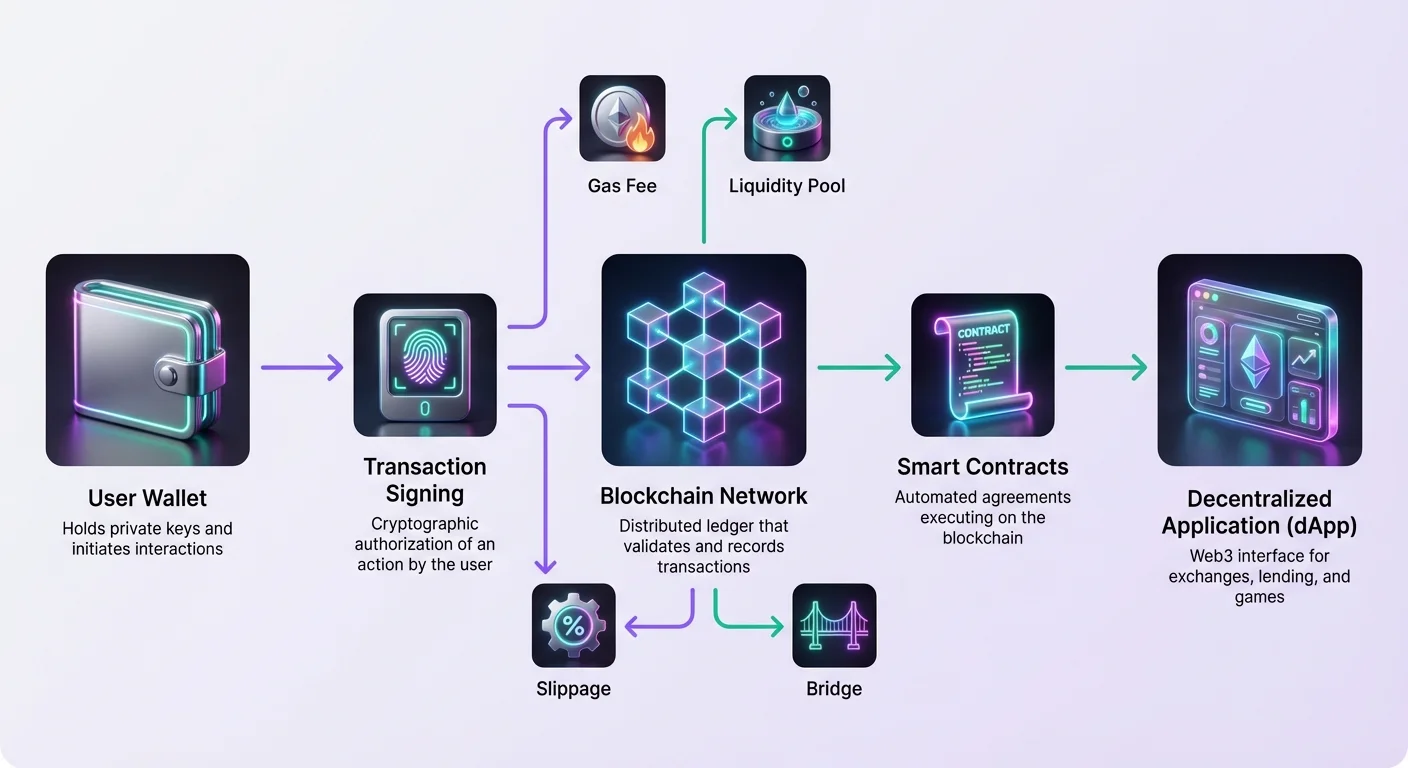
This setup primarily involves three components. First, you need a self-custodial interface to hold keys and sign transactions. Second, you require the native asset of the network to pay for computational resources, known as gas. Third, you must establish a secure connection between your interface and the decentralized applications you wish to use. Mastering these elements ensures you can trade, lend, or stake assets without relying on intermediaries.
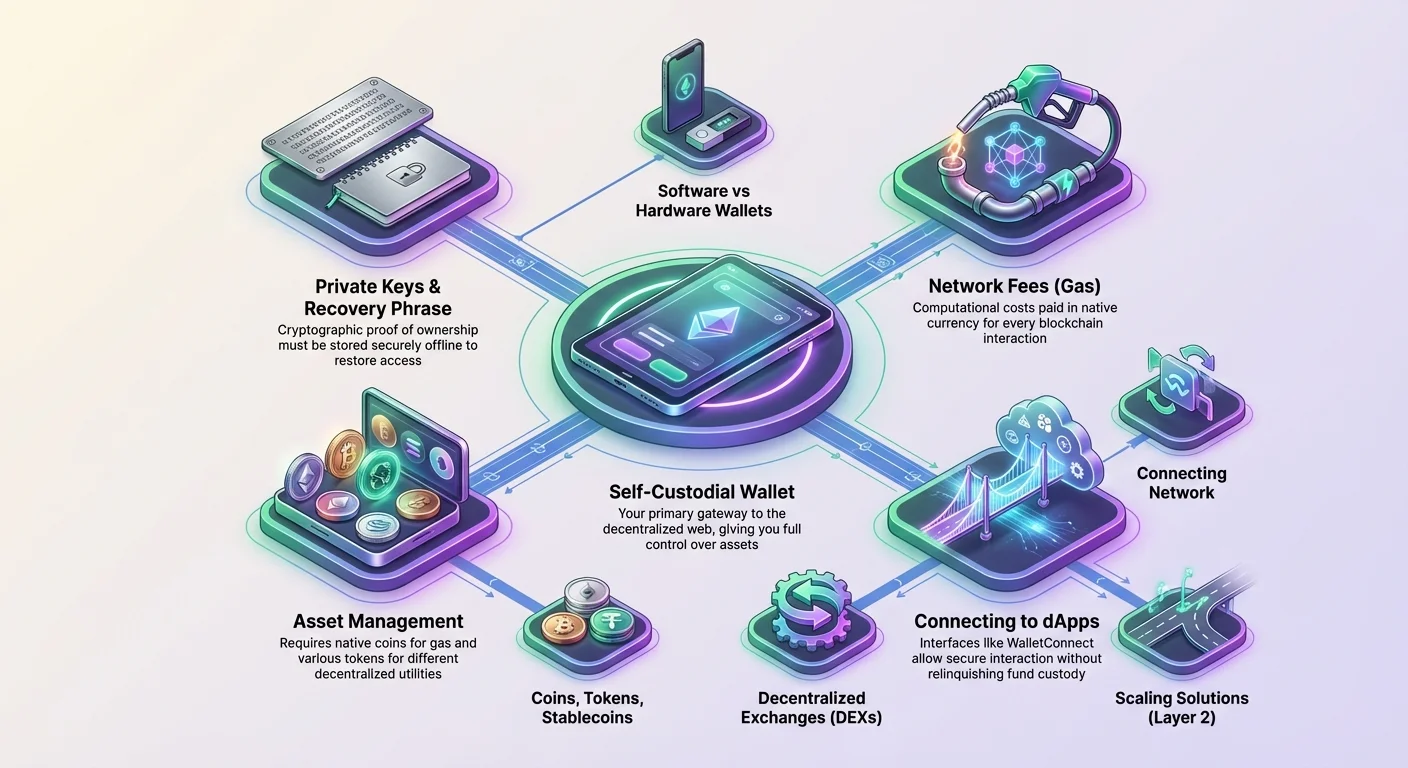
The Core of Decentralization: Self-Custodial Wallets
A self-custodial wallet is the primary gateway to the decentralized web. It differs significantly from the accounts you might have on centralized trading platforms. In a custodial model, the exchange holds the private keys to the funds, effectively acting as a bank. They grant you permission to access your balance. In a self-custodial model, the software or hardware device generates and stores the private keys locally. You do not need permission to access or move your funds because you own the cryptographic proof of ownership.
Private Keys and Recovery Phrases
When you create a new wallet, the software generates a random string of data that forms your private key. This key is what allows you to authorize transactions on the blockchain. Because raw private keys are difficult for humans to read and record, modern wallets convert this data into a "recovery phrase" or "seed phrase." This is typically a set of 12 to 24 random words generated in a specific order.
This sequence of words is the master key to your digital vault. Anyone who possesses this phrase can access your funds from any location or device. Therefore, it is imperative to write these words down physically and store them securely offline. Storing them in cloud notes, screenshots, or emails exposes them to potential digital theft. If you lose your device, this phrase is the only way to restore access to your assets on a new device.
Software vs Hardware Solutions
Wallets generally fall into two categories based on how they handle internet connectivity. Software wallets, often called "hot wallets," exist as mobile applications or browser extensions. They are always connected to the internet, making them highly convenient for frequent interactions with decentralized applications (dApps). They are ideal for managing smaller amounts of active capital used for daily trading or payments.
Hardware wallets, or "cold wallets," are physical devices that store private keys offline. When you need to sign a transaction, you connect the device to a computer or phone. The transaction data is sent to the device, signed internally using the private key, and then the signed data is returned to the network. The private key never touches the internet-connected device. This method offers superior security for long-term storage of significant value, as it protects against malware or remote hacks that could compromise a hot wallet.

Navigating Network Fees and Gas
Every action you take on a blockchain requires computational power from the network's validators. Whether you are sending a simple payment or executing a complex smart contract function, you must compensate the network for this work. This compensation is called "gas." On the Ethereum network and its compatible chains, gas is paid in the network's native currency. For Ethereum, you pay in ETH. For a network like Avalanche, you pay in AVAX.
How Gas Calculation Works
The total fee you pay is determined by two factors: the complexity of the transaction and the current demand for block space. Simple transfers require less gas, while complex interactions like swapping tokens or minting NFTs require more. The price per unit of gas fluctuates based on network traffic. When many users compete to have their transactions included in the next block, the price rises.
Modern fee mechanisms, such as Ethereum's EIP-1559, split the fee into a "base fee" and a "priority fee." The base fee is burned (removed from circulation), while the priority fee acts as a tip to validators to incentivize them to prioritize your transaction. If you set your gas fee too low during periods of high congestion, your transaction may remain pending until demand drops.
Strategies for Fee Management
Understanding fee markets is essential for cost-effective onboarding. Users can often customize the fees they are willing to pay within their wallet interface. Setting a lower fee can save money if you are willing to wait longer for confirmation. However, setting it too low risks the transaction getting stuck indefinitely or being dropped by the network.
| Strategy | Description | Risk Level |
|---|---|---|
| Wait for Off-Peak | Transact during weekends or late hours (UTC) | Low |
| Custom Low Fee | Manually lowering the Gwei bid in settings | High (Stuck tx) |
| Layer 2 Usage | Moving assets to scalable rollups | Low |
Monitoring gas trackers before initiating a transaction is a practical habit. These tools provide real-time estimates of the current cost of a "swap" or "transfer," allowing you to time your activity for when the network is less congested.
Asset Management: Coins, Tokens, and Stablecoins
Once your wallet is set up, you need to fund it. The first asset you must acquire is the native coin of the blockchain you intend to use. This is because you cannot execute any transaction without paying gas. For example, if you hold a token like USDC on the Ethereum network but have zero ETH in your wallet, your USDC is effectively stuck. You cannot send or swap it because you lack the ETH required to pay for the network processing.
Beyond the native coin, the decentralized ecosystem relies heavily on tokens. While coins run on their own independent blockchains, tokens are digital assets built on top of existing blockchains using smart contracts. The most common standard for these is ERC-20 on Ethereum. These tokens can represent anything from voting rights in a protocol to utility in a game or even other currencies.
Stablecoins are a critical subset of tokens designed to maintain a steady value, usually pegged 1:1 to a fiat currency like the US Dollar. Assets like USDT or USDC allow users to interact with decentralized finance applications without being exposed to the price volatility of Bitcoin or Ethereum. They serve as a stable medium of exchange and a safe harbor during market downturns. When onboarding, having a balance of stablecoins alongside your native gas token provides flexibility for trading and earning yield.
Connecting to the Ecosystem
Your wallet serves as your identity and bank account, but to do anything useful, it must connect to decentralized applications (dApps). These applications are the interfaces for exchanges, lending protocols, and games. Unlike Web2 websites where you log in with an email and password, Web3 applications require you to "connect" your wallet. This process does not give the site access to your funds; it simply allows the site to view your public address and request transaction signatures.
The Role of WalletConnect and Bridges
WalletConnect is an open-source protocol that facilitates secure communication between mobile wallets and desktop dApps. It typically works by scanning a QR code on the dApp's screen using your mobile wallet app. This creates an encrypted bridge between the two. Once connected, any action you take on the dApp triggers a pop-up on your phone asking for approval. This ensures you verify every interaction on your trusted device.
For users operating across multiple blockchains, "bridges" are essential infrastructure. A bridge is a protocol that allows you to move assets from one network to another. If you have ETH on the main Ethereum network but want to use a cheaper Layer 2 network, you must bridge your assets. This involves locking the asset on the source chain and minting an equivalent representation on the destination chain. This interoperability is key to navigating the broader DeFi landscape.
Interacting with Decentralized Exchanges (DEXs)
A Decentralized Exchange (DEX) allows you to trade cryptocurrencies directly with other users or against a pool of assets. Unlike centralized exchanges that use order books to match buyers and sellers, most DEXs use Automated Market Makers (AMMs). In an AMM, users trade against a "liquidity pool"—a smart contract containing pairs of tokens.
When you initiate a swap on a DEX, you are interacting with this smart contract. The price is determined algorithmically based on the ratio of tokens in the pool. A key concept here is "slippage." Slippage is the difference between the expected price of a trade and the price at which the trade is actually executed. This often occurs during periods of high volatility or when trading large amounts relative to the pool's size. Most interfaces allow you to set a "slippage tolerance" (e.g., 0.5% or 1%). If the price moves unfavorably beyond this percentage during the transaction, the trade cancels automatically to protect you.
Scaling and Layer 2 Solutions
As adoption of Ethereum grew, the network faced challenges regarding scalability and high transaction costs. This led to the development of Layer 2 solutions. These are separate blockchains that operate on top of the main Ethereum network (Layer 1). They process transactions off the main chain to reduce congestion and then bundle, or "roll up," the data to post back to Ethereum for final security.
Using Layer 2 networks creates a significantly cheaper and faster experience for the user. A swap that might cost $10 on Ethereum could cost pennies on a Layer 2 rollup. There are two main types of rollups: Optimistic Rollups and Zero-Knowledge (ZK) Rollups. Both aim to inherit the security guarantees of the main network while providing the efficiency needed for everyday usage.
Onboarding to a Layer 2 network usually involves adding the network details to your wallet settings (RPC URL, Chain ID) and bridging funds from Layer 1. Once set up, the user experience is nearly identical to using the main network, but with much lower friction regarding fees. This accessibility makes Layer 2s the preferred environment for many DeFi applications, gaming projects, and payment platforms.
Conclusion
Onboarding to decentralized finance is a process of establishing digital sovereignty. By setting up a self-custodial wallet, you reclaim ownership of your financial data and assets. Understanding the mechanics of gas fees ensures you can navigate the network efficiently without overpaying for simple actions. Furthermore, recognizing the distinction between coins and tokens prevents common pitfalls, such as stranded assets due to a lack of gas funds.
Security remains the paramount concern throughout this journey. Protecting your recovery phrase and verifying every transaction signature are non-negotiable habits. As you connect to dApps and explore scaling solutions like Layer 2s, the technical complexity decreases, but the need for vigilance remains. With these foundational elements in place, you are equipped to explore the vast possibilities of the decentralized economy.
Only you can protect your private keys, so never share your recovery phrase with anyone.